")
Kindle Display for Eaton UPS (via NUT)
I’m more into audiobooks, so let’s repurpose this Kindle.
I recently acquired an Eaton 9SX2000 UPS to keep my home office online during short power outages and give my server time to shut down gracefully. I turned my 7th Gen Amazon Kindle ebook reader into an always-on display that sits on my wall and shows the status of the UPS, its load, and its battery charge.
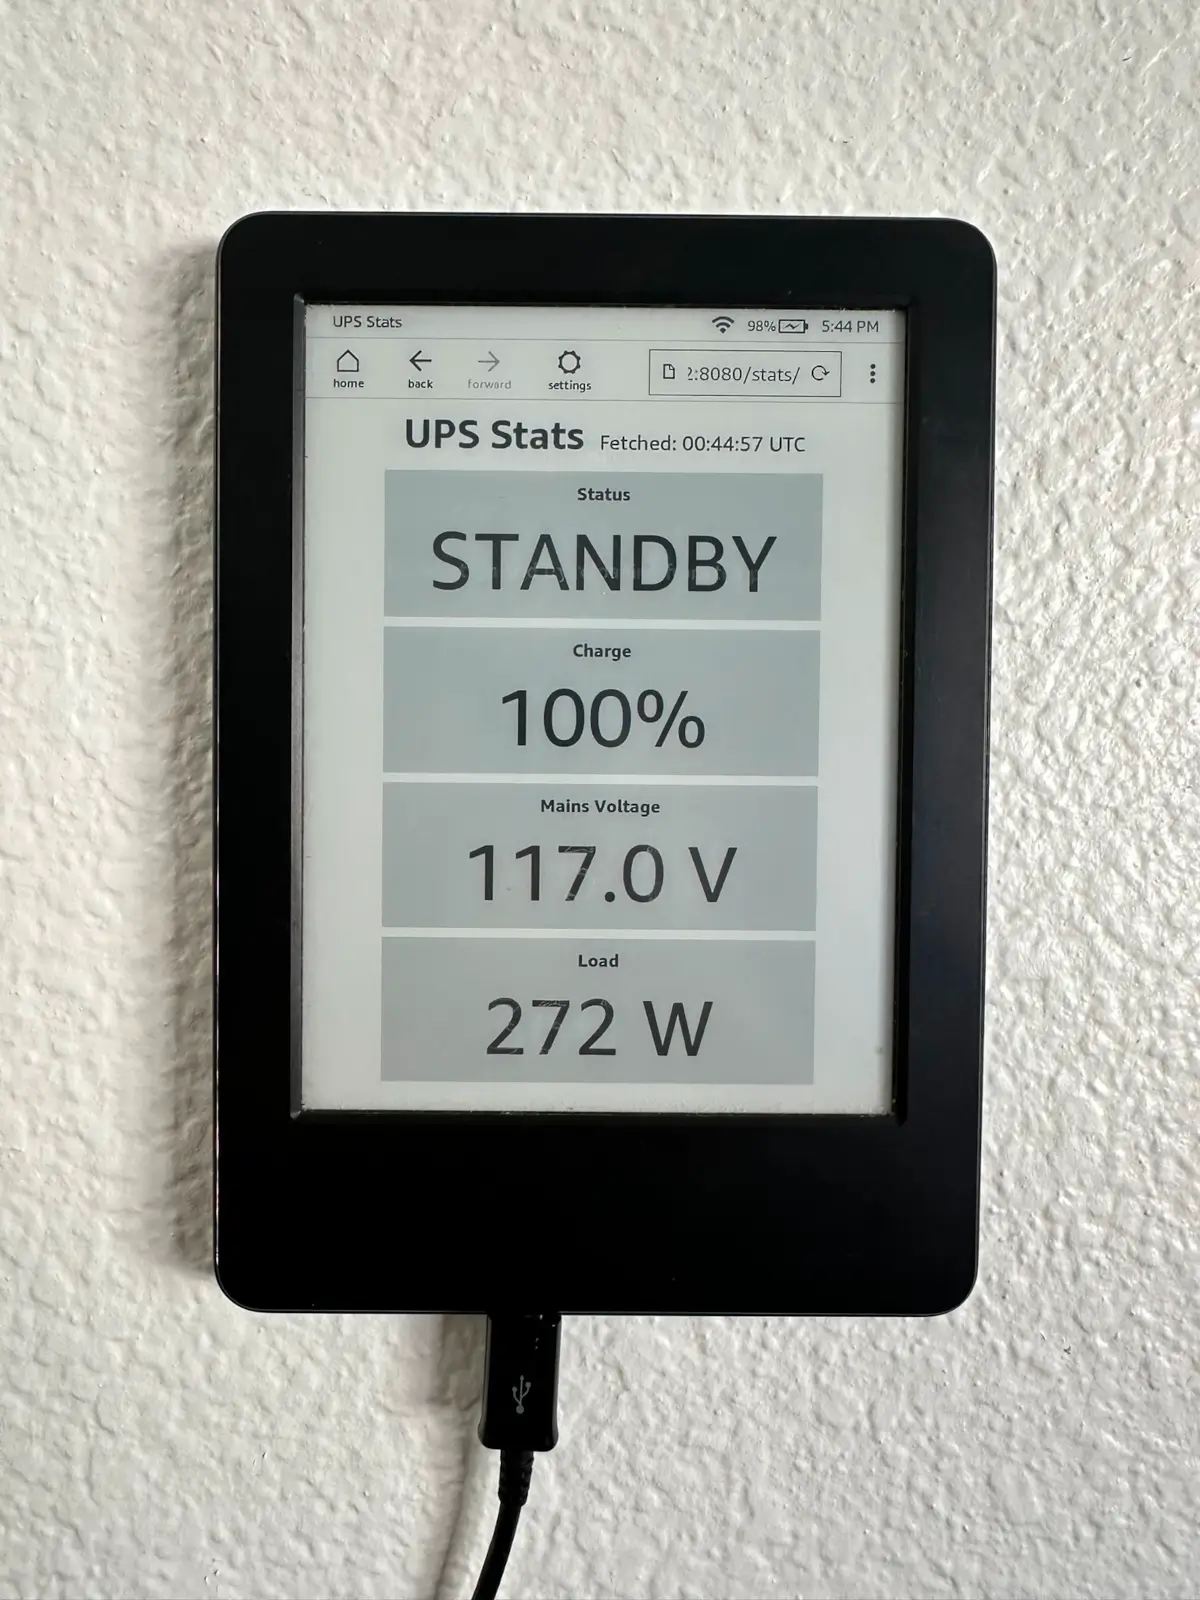
When utility power is stable and the UPS is in “High-Efficiency mode” aka bypass mode, the Kindle shows STANDBY, along with the percentage of battery charge, mains voltage, and load in watts. When utility power flickers, the UPS goes into double conversion mode to smooth out the power fluctuations, and the Kindle shows ONLINE. When mains power fails altogether, the Kindle shows BATTERY, and the Kindle’s mains voltage panel switches to an estimated runtime panel.
In this post I will share what drew me to buy the Eaton 9SX2000, how I concluded that using a shady-looking electrical adapter is actually a good idea, then share how I got its output to display on the Kindle, and finally share the code I used so that you can do the same yourself.
Replacing APC with Eaton
Before buying this Eaton UPS, I had an APC Back-UPS Pro which unfortunately failed during our last outage. I had been running it at about 80% load (700W/900W) when it unexpectedly dropped the load. There had been no alerts or other indicators that the UPS had been degraded. So when it went down, it was a bit of a surprise.
In researching replacements, I came up with the APC SMT2200C, OPTI-UPS DS2000E, Eaton 9SX1500, and Eaton 9SX2000.
I decided not to go with the OPTI-UPS because, while much cheaper, they are a relatively unknown brand. It was important to get something reputable since it would be protecting important equipment. Knowing that good UPSes can last well over a decade, I decided to spring for the Eaton. While APC, CyberPower, and TrippLite each have a fair share of mixed reviews, it seems surprisingly few people online have anything negative to say about Eaton units.
I decided to go with the 1800W 9SX2000 instead of the 1350W 9SX1500, as I want to have room to grow my power footprint in the future. I never wanted my UPS to unexpectedly drop a load again.
20 Amp Appliance on a 15 Amp Circuit
One thing that came up in my research is that the UPSes in this capacity range have NEMA 5-20 power plugs, which don’t fit in the standard 5-15 outlets in US homes. From my experience with computers, I’m very aware that on the internet you can get adapters from anything to anything, and that the real questions are always (1) how well will it work and (2) how safe will it be. Turning to Reddit as I usually do with questions like this, I found many threads where people had asked whether it is safe to use a 5-20 to 5-15 adapter to plug a large UPS into a residential power outlet. And in typical Reddit fashion, the replies ranged everywhere between “completely harmless and your breaker will protect you if you draw too much power” to “do not plug that in, it will cause a house fire”, with scant explanation or sources on either side of the argument.
I don’t consider myself an “electricity guy” (or much of a “guy” anymore either if we’re being honest), but this dichotomy of responses prompted me to dig into the issue deeper so that I could more fully understand the electrical principles at play. In summary, modern homes are made up of multiple electrical circuits, each one tied to a circuit breaker in your breaker panel, often located in your garage or entryway. As you use high-wattage appliances, the electrical wires in your walls begin to heat up. All this electricity runs through the circuit breaker, which has a bimetallic strip in it that heats up too. If the bimetallic strip heats up too much, it will bend and open the electrical circuit, cutting the power for that circuit of the house and preventing the wiring from heating up any further. Ideally the circuit breaker will be calibrated so that when the home’s wiring is within acceptable temperatures, the breaker does not trip, and when the wiring heats up to a potentially dangerous point, the breaker trips.
In addition to this thermal trigger, a breaker also has a magnetic trigger. Whereas the thermal trigger is designed to prevent the wiring from gradually overheating, the magnetic trigger behaves more like the circuit breaker’s “panic function” of sorts. It steps in immediately when there is something very wrong with the circuit load that needs to be dealt with immediately - say there is a short circuit somewhere, or the circuit is otherwise suddenly extremely overloaded. I won’t be discussing the magnetic trigger anymore at all - it’s not relevant to this post.
Due to the nature of the thermal trigger, breakers typically allow their load to go a fair bit over their rated capacity for some amount of time before tripping. This is because wires take some time to heat up even with considerable amperage running through them. This “time-to-trip” can be represented in a breaker’s trigger curve graph.

So due to its design, a 15A breaker will typically not trip if its protected circuit is loaded less than 15A (which at a typical US voltage of 120V, comes out to 1800W). Higher than that, and tripping takes an amount of time commensurate with the severity of the overload. At 16A, the breaker may take many hours to trip if at all. At 20A, it may take many minutes or an hour. At 30A - more than twice the circuit’s rated capacity - it still takes over a minute to trip the breaker.
According to the US National Electrical Code (NEC) and the UL certifying body:
- A circuit must allow its maximum rated current to be drawn from ANY receptacle on the circuit. In other words, it is safe to draw all 15A from a single outlet on a 15A circuit as long as no other outlet is in use.
- A single appliance must not be designed to draw more than 80% of a circuit’s capacity. For a common 120V 5-15 appliance, this 80% figure comes out to 1440W (UL uses 125W for their certifications, making the figure come out to an even 1500W).
- A UPS is bound by the same electrical guidelines as any other appliance. There’s no exception here for an appliance that consumes a variable amount of energy depending on what you plug into it, or for an appliance that is designed not to typically run at its full rated power draw.
- 5-15p power taps (plug strips) and 5-15p hair dryers are given exceptions and thus are commonly certified for 1875W (15A at 125V). My guess is that power taps are an exception because they are “dumb” enough to not count as an appliance, and hair dryers are an exception due to their obviously exceedingly sparing usage patterns.
If we assume that all devices are UL-listed, receptacles are up to code, breakers are functional and no adapters are used, then the culmination of these rules takes us to some interesting conclusions:
- UL thinks it’s fine if a hair dryer intermittently consumes 1875W on a 15A circuit, but it’s not okay if a UPS intermittently consumes 1800W.
- If you plug things directly into the wall, you’re allowed to use 100% of a circuit’s rated capacity in sessions of as long as 3 hours. But if you plug things into a UPS, you’re only allowed to use 80% of the circuit’s rated capacity, and the other 20% remains inaccessible. So just by UPS-protecting a room full of gear, you’re effectively trimming your circuit’s burst capacity by 20%.
-
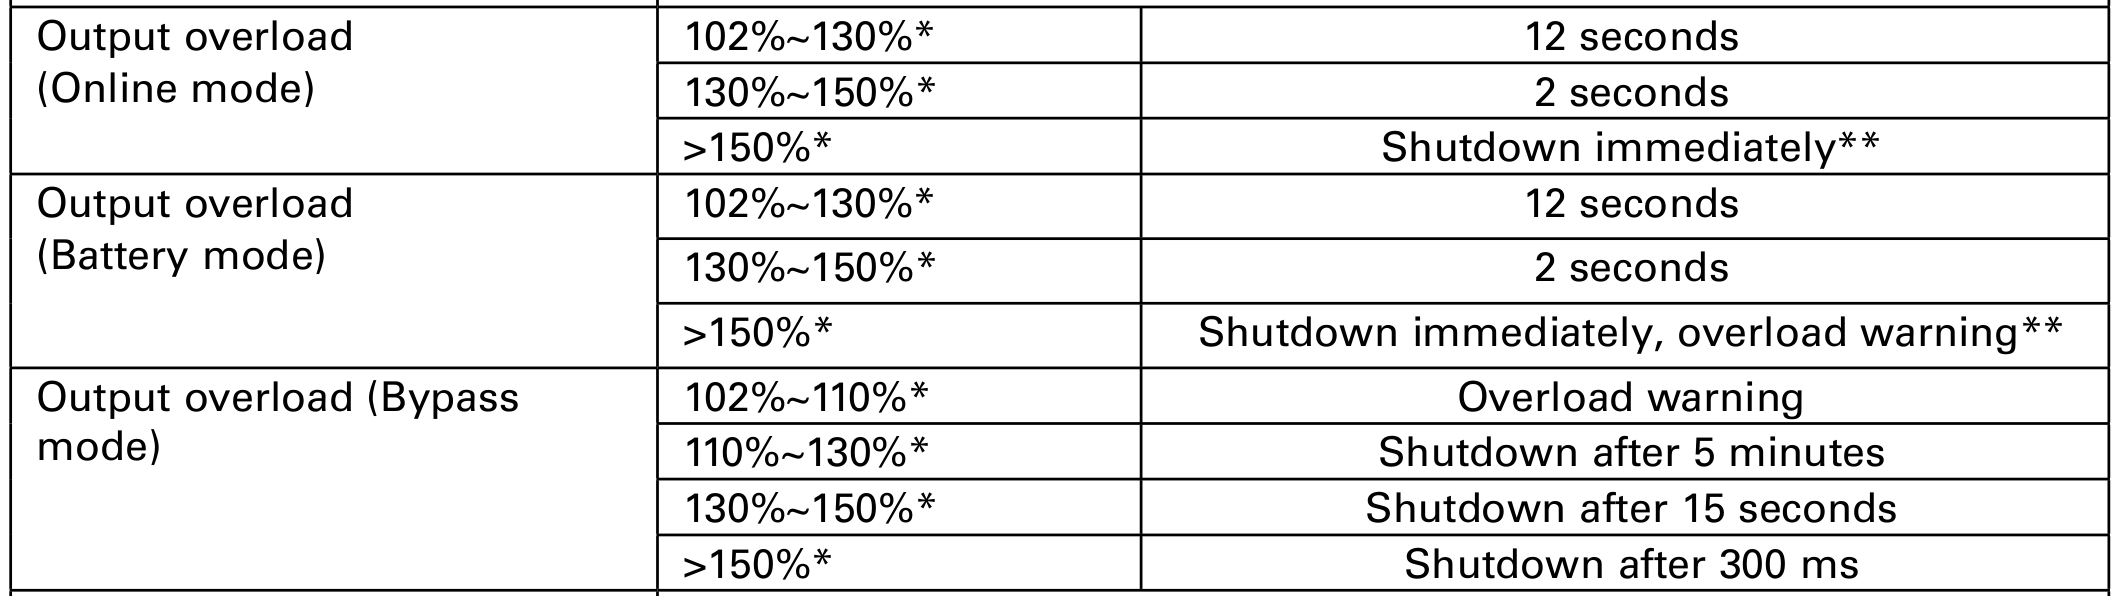
If you run any 15A-circuit-rated UPS under a 12.6A load, it overloads and drops its load within seconds. If you run any 15A circuit under a 12.6A load, it will likely sustain the load indefinitely. Therefore, a UPS will overload far before any breaker is designed to trip. (See these Eaton 9SX specs for its maximum number of seconds sustainable on overload:)
Here is why those conclusions are a bit silly, at least in my case:
- The UPS is more or less on its own dedicated 15A circuit. The only other things drawing power are some LED lights.
- My usage of the UPS is just as intermittent as any other load (intermittent being defined as less than 3 hours of continuous use at 80-100%). Whenever I am queued for a match or not gaming, my gaming computer uses 200W less, so that represents 200W of intermittent load. I rarely use my TV for more than 3 hours at a time (and would be mindful of it if I were heavily loading the circuit elsewhere), so its 300W load is intermittent. My servers run at less than 30% of their max rating except in the rare case that they are performing a manually initiated long-running task, so their energy usage patterns are intermittent as well.
- The battery charger in my particular Eaton UPS has somewhat negligible power consumption at ~100W. So after an outage, only 100W gets added to the circuit by the charger. This is not enough to cause a circuit overload unless the circuit is already at risk of overload. Also of note is that the battery charges fully within three hours, so the charger itself would be classified as an intermittent load if it were a standalone appliance.
- In reality I don’t actually plan to put any more than about 1000W on the UPS, even at peak. The reasons I oversized the UPS are to future-proof my setup for when I have more gear (and potentially access to a 20A circuit), and to never worry about my UPS overloading again.
To summarize everything, the requirements of the 5-15 plug certification just do not make sense for UPSes in all cases, because a UPS is a totally unique type of appliance. It’s safe to use a NEMA 5-20p UPS on a 15A circuit for lighter and/or intermittent workloads, as long as you account for the power draw of the battery charger.
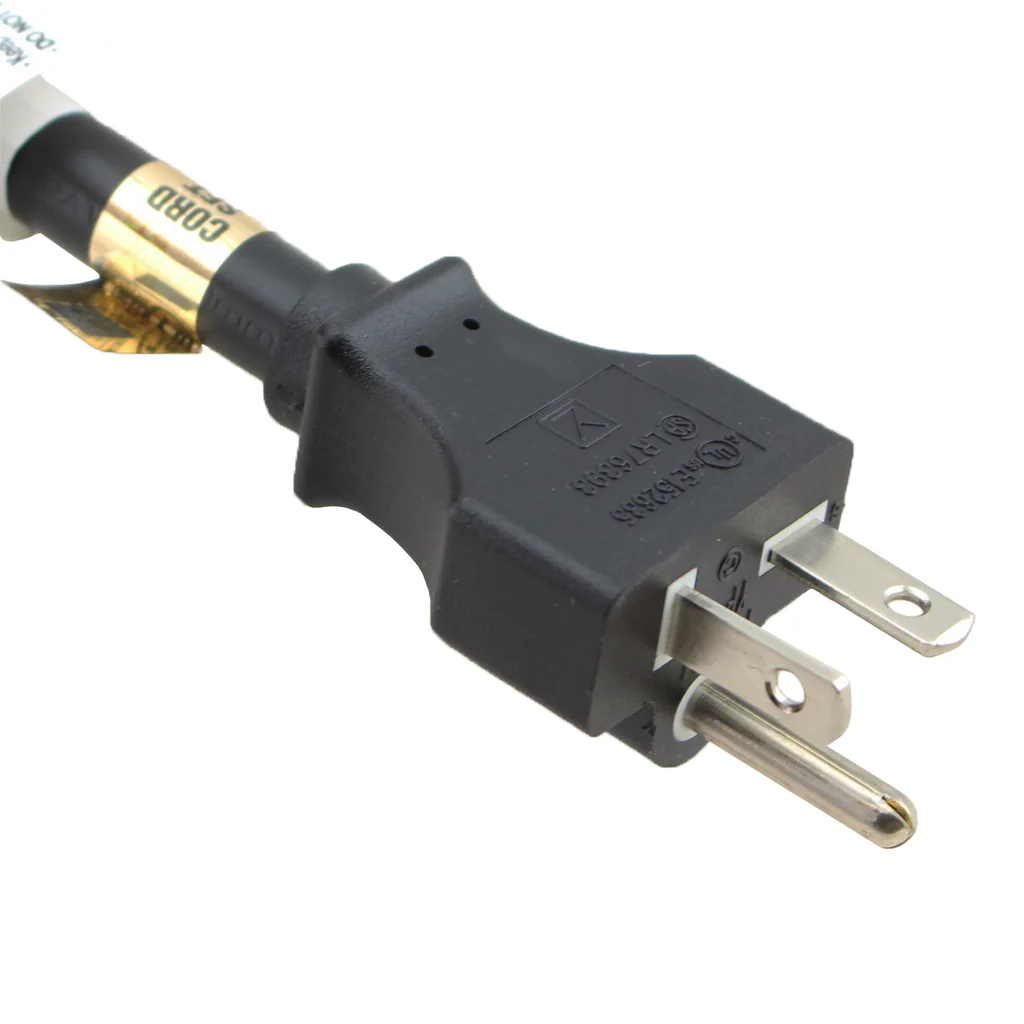
And that’s where one of these bad boys comes in:
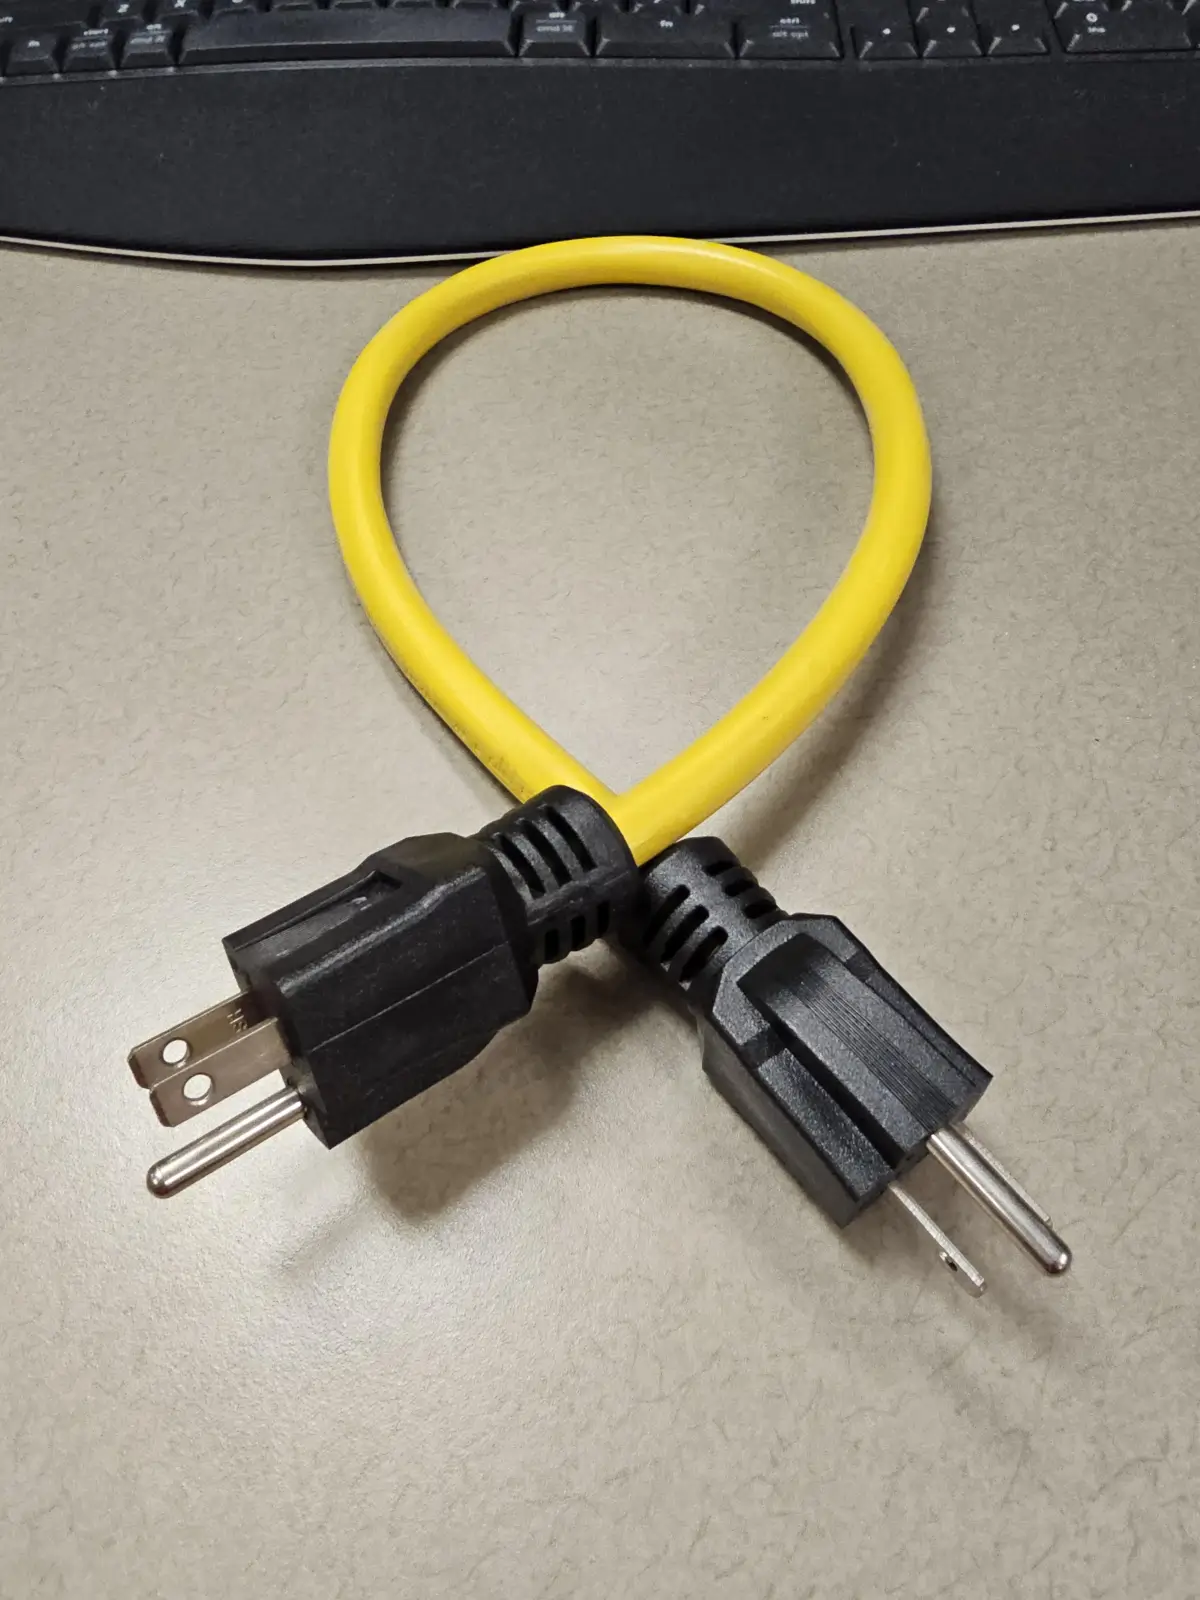
Ahem… oops, wrong picture. I’m not using that cable, and even looking at it is giving me anxiety. To be exceedingly clear, do not seek that out or use that. This is the cable I am actually using:
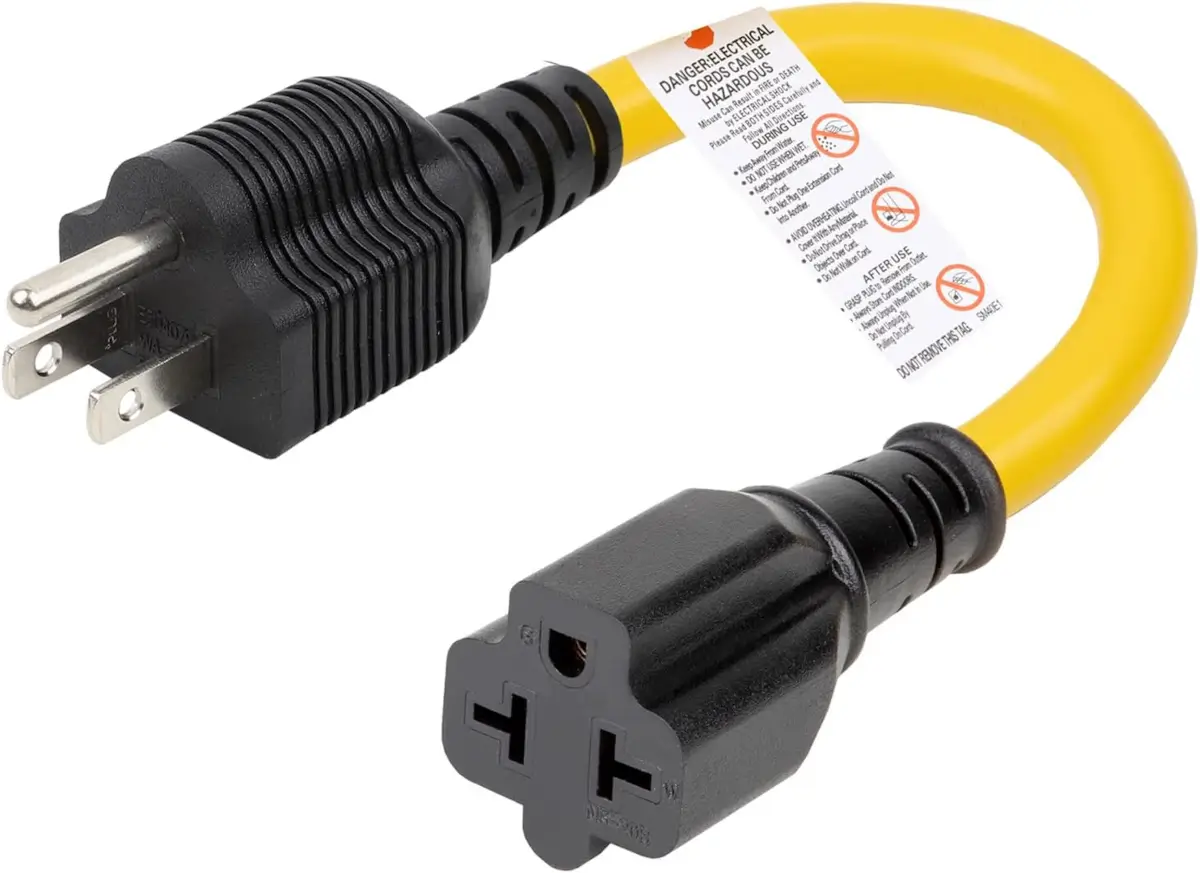
I do feel dirty using it. But not in a bad way, y’know?
Alright, so we’ve got the UPS plugged into the wall, and the server plugged into the UPS. Now let’s configure the server to shut down before the battery runs out during an extended outage.
Installing Network UPS Tools
Every server running on a UPS needs automation so that the server shuts down gracefully before the battery runs out in an outage. Luckily this is a Solved Problem. Unless you’re a retail user or an enterprise company, you’ll be using open source for this. As far as I can tell, there are two popular open-source UPS management tools out there for server use: “APC UPS Daemon” or Apcupsd (pronounce this “ah-puh-CUPS-duh” if you want to sound like a lunatic), and “Network UPS Tools” or NUT (pronounce this like everyone’s favorite vegan protein source).
Apcupsd is simple to use and easy to configure, but for the most part it only supports APC brand UPS units. This is what I had been using before to manage my APC UPS, but now I have an Eaton UPS. So since I am running Ubuntu Server, I used these commands:
sudo apt remove apcupsd
and
sudo apt install nut
Configuring NUT is a bit of an involved process, but I had great success with the tutorial Setup nut and netdata on Ubuntu by Jiab77. I skipped the netdata part and the parts about the scheduling script and commands scheduling, since I’m not planning to use those features. The important sections are “Detect connected UPS”, “Create monitoring connection” and “Start nut services”. With any luck, you’ll have NUT running as I did.
At this point, I tested the built-in shutdown script by running:
sudo upsmon -c fsd
If NUT is configured properly, as it was in my case, this will shut down the server gracefully and then stop the UPS. This effectively simulates the low battery alarm that would occur on the UPS after an extended outage. For more details on this process, see Section 6.3 of NUT configuration notes.
In my case, I ended up configuring NUT for “netserver” mode since I have multiple servers running on the UPS, and I want all of them to shut down gracefully in an outage. Configuring the other server to connect over LAN as a NUT client is beyond the scope of this article.
Installing NUT-CGI
I used the “Web monitoring” section of this tutorial UPS Server on Raspberry Pi by tollsjo to set up NUT-CGI.
To summarize, we install Apache and nut-cgi using:
sudo apt install apache2 nut-cgi
To make the CGI program aware of our NUT UPS, we edit /etc/nut/hosts.conf to include:
MONITOR ups@localhost "Local UPS"
We enable CGI support in Apache:
sudo a2enmod cgi
We restart Apache:
sudo service apache2 restart
And finally, we open up a web browser to http://[SERVER IP]//cgi-bin/nut/upsstats.cgi?host=ups@localhost.
In my case, I wanted to take two additional extra steps.
Firstly I set Apache to serve on a nonstandard port (8080), because my ports 80 and 443 are already taken by other web server software listening for a different project. To do that, I edited my ports.conf and 000-default.conf files in the same fashion as this tutorial.
Secondly, since I use a firewall on my server, I added a firewall rule to allow incoming connections to the web server port. You wouldn’t believe how often I bamboozle myself because I’ve forgotten to punch a hole in the firewall and I’m sitting wondering why I can’t access a service on my server.
If it’s a success, you should see something like this in your browser:
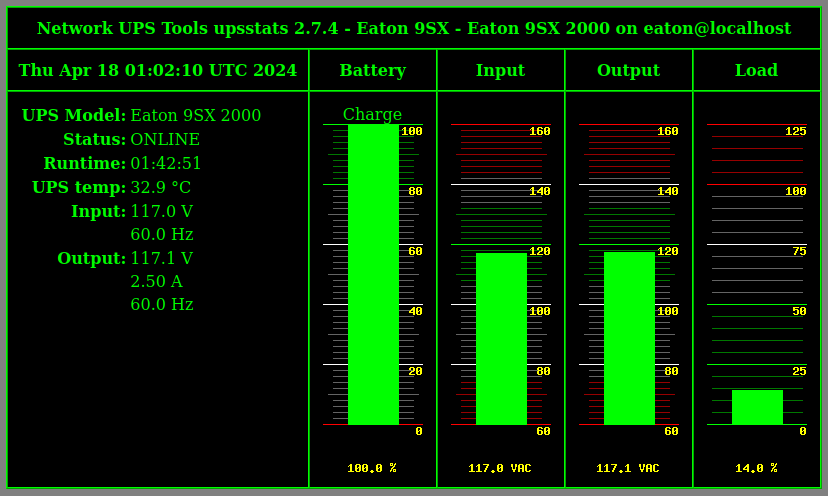
It looks straight out of the early 2000s, doesn’t it? And if you load it in your Kindle’s “experimental web browser” it looks pretty grody:
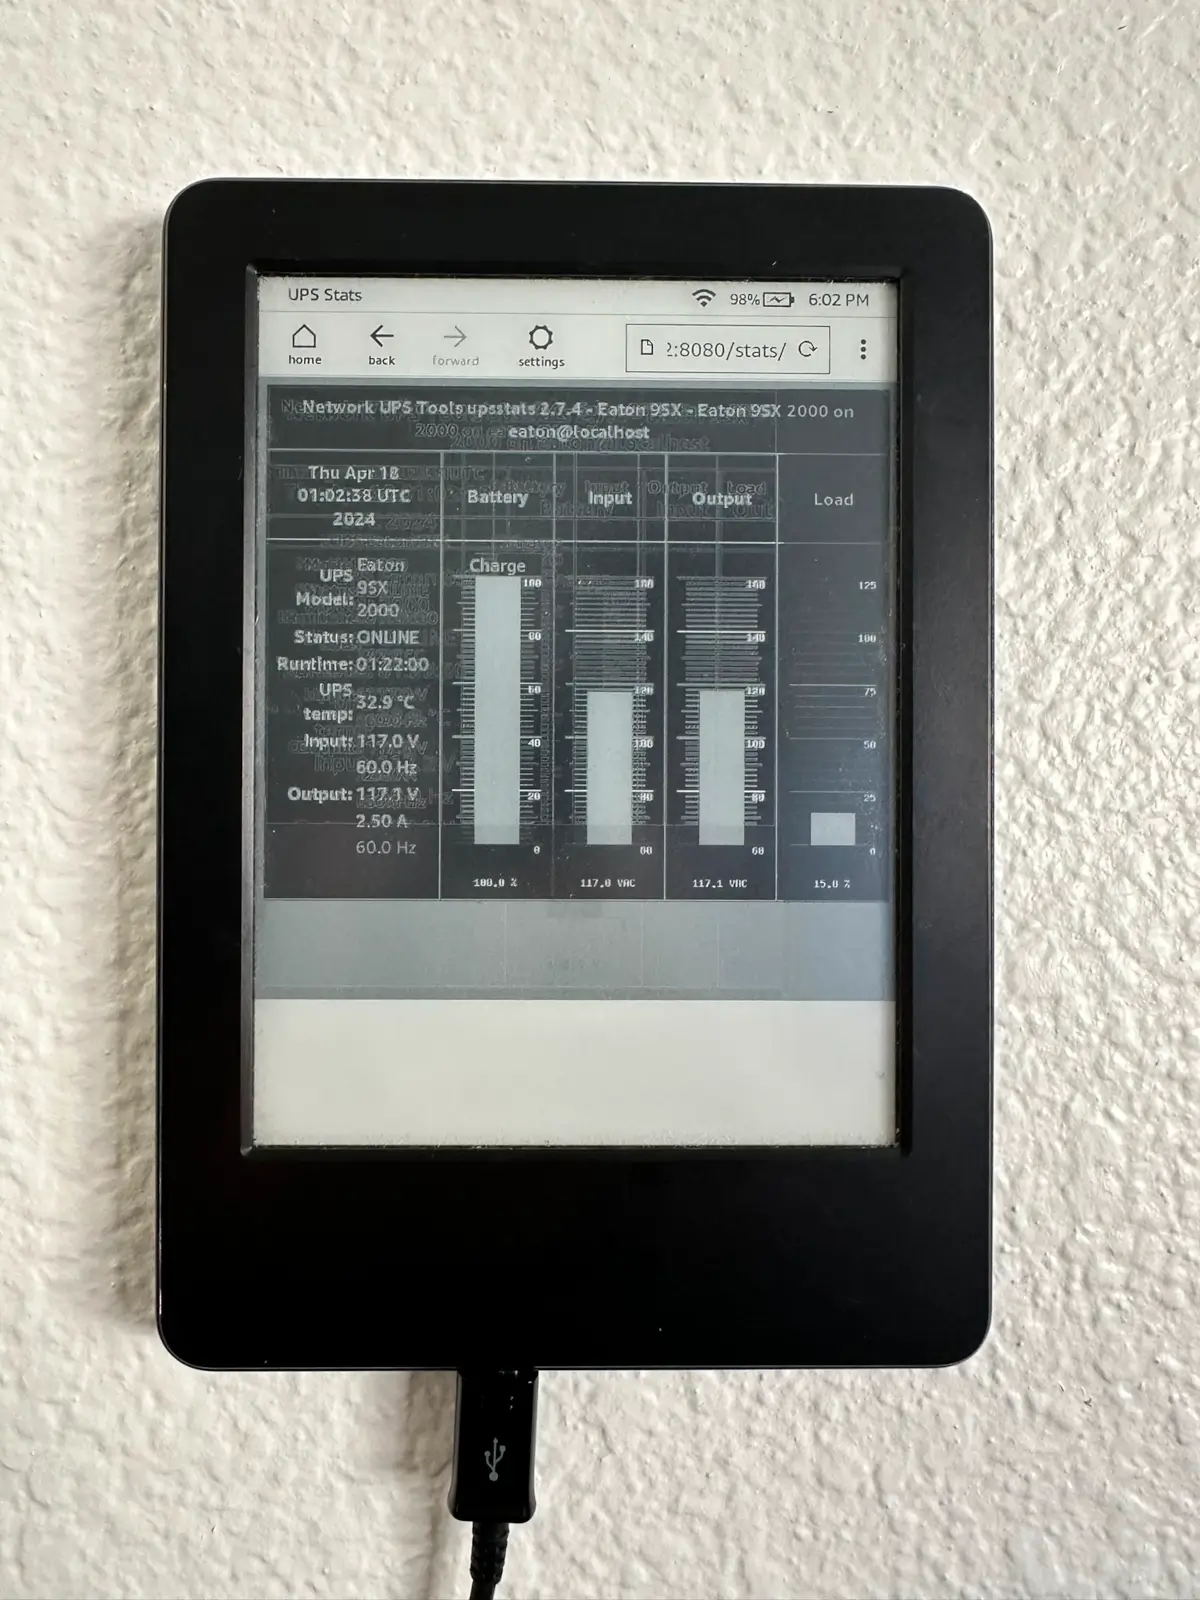
Let’s update the template so that it looks better on a Kindle screen.
Editing The NUT-CGI Template
In serving up the web page of UPS stats, NUT uses an HTML template conveniently located in nut’s config directory, typically at /etc/nut/upsstats-single.html.
Note: The upsstats-single.html template is used if you connected a single UPS to the CGI software. The upsstats.html template is used if you connected multiple.
If we peek into the default template, we can see some hallmarks of it being written in the caveman days of the internet. It was written for the HTML 4.0 Transitional specification, which was drafted in the year 1997 and was no longer the newest HTML version by 2001. It uses the HTML table element for layouts, which has not been a recommended practice in web development since the early 2000s or earlier. Everything points to this web page being written in about the year 2000.
So I wrote a new template, and refined it, and refined it.
I consulted the UPSSTATS.HTML reference to learn about NUT’s extremely rudimentary templating language. I ran upsc ups on my server to print a readout of all the variables my particular UPS supports.
At some point I realized that the templating language was insufficiently documented and low-key kind of cheeks, so I switched over to writing my logic in JavaScript.
I got the template running well and looking good when accessed using the web browser on my workstation. Here’s a screenshot:
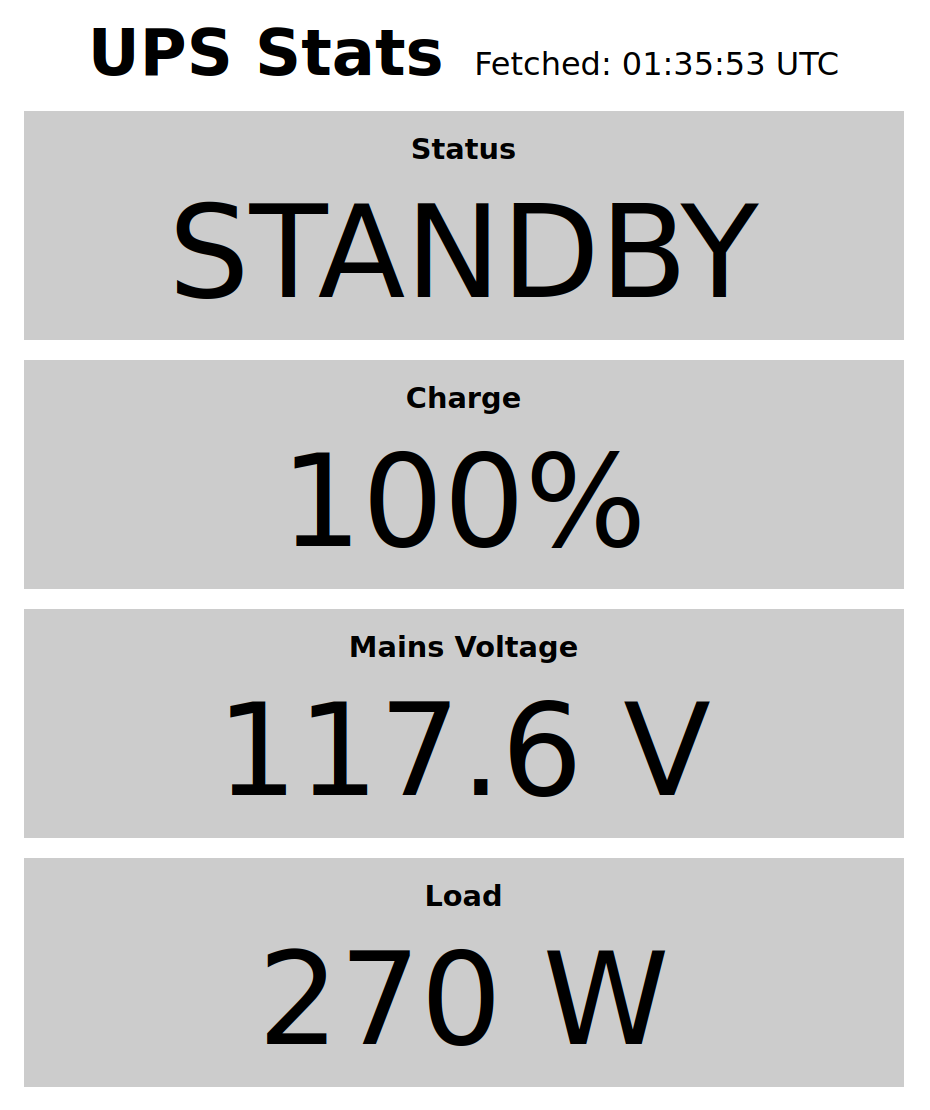
The final test was to see if it would load on the Kindle.
Kindle Quirks
So I loaded it on the Kindle… and I didn’t get any stats. It looked like the Kindle was just straight-up refusing to run my JavaScript. But I know Kindles can run JavaScript. Long story short, my Kindle 7th Gen’s web browser probably hasn’t seen a single update since the device’s launch in 2014. This means that newer versions of JavaScript are unsupported, notably ECMAScript 2015, also known as ECMAScript 6 or ES6. And out of habit, I had been writing ES6 code.
After changing all my const keywords to var, and changing my use of string.includes to a custom function based on indexOf, I was off to the races. The Kindle loaded my page. I was seeing live UPS stats on the Kindle!
I tried adding a meta refresh directive to the page to force it to refresh every ten seconds, but this turned out to be a fragile way of doing things. If the page load timed out at any point for any reason, say I needed to reboot the server or the network went down for a few seconds, the Kindle would forever sit on a “server could not be reached” screen.
I found a simple trick to fix that. I created a second, “wrapper” page that embeds the CGI page in a full-screen iframe. That “wrapper” page contains JavaScript that refreshes the iframe every ten seconds. Notably, the wrapper page stays loaded in the browser no matter what, so if the connection to the server is ever lost, the frame will continue to be dutifully refreshed every ten seconds anyway and it will eventually display fresh data.
Finally, I noticed that the stats themselves - voltage and load - did not seem to be refreshing every ten seconds as expected. It was taking thirty seconds for the numbers to actually change. As it turns out, NUT limits its polling of “less-critical variables” over usbhid-ups (NUT’s USB driver) to 30 seconds by default. So, I increased that frequency to 10 seconds by adding pollfreq = "10" to my UPS’ manifest in my /etc/nut/ups.conf file. After running the NUT restart one-liner from Jiab77’s tutorial:
for S in nut-client.service nut-driver.service nut-monitor.service nut-server.service ; do sudo systemctl restart $S ; done
…we’re all done! Now we’ve got an always-on e-ink display that shows our UPS status. Wait, aw biscuits, the Kindle display fell asleep.
Wake up the Kindle, go to the search bar, type in ~ds, and hit enter (I imagine it must stand for “disable sleep”). From what I read, they are removing this feature in newer devices and newer firmware versions for some reason. I guess Amazon doesn’t like it when people reuse their devices for display projects like this, and would rather have them sit in warehouses forever in hopes that the kind of person who scours eBay for a $26 Kindle might be the same kind of person who would use it to buy a bunch of new release ebooks from the Amazon store at $15 a pop.
Oh and if you’re wondering, it’s mounted to the wall with a bunch of fun-tak putty. It’s been a few days and it hasn’t fallen yet!
The Code
I wrote this code in feral mode, and I don’t have a lot of motivation to clean it up just for this blog post, especially since whoever uses it will probably end up modifying it anyway. Whoever uses this will likely want to change it because their UPS doesn’t have double-conversion functionality, or because they want the output displayed in Amps instead of Watts, or they want a display of which outlet groups are switched on, or any number of other reasons. I’ll at least indent the code for you, though! If I were to “do it right”, I would write it using ES6+, comment it fully, fix some of the lazy variable namings, lint it, and have it go through a transpilation and minification process targeting pre-ES6 devices.
Without further yapping, the code.
First, here’s the upsstats-single.html template itself:
@TEMPC@
@UPSSTATSPATH upsstats.cgi@
@UPSIMAGEPATH upsimage.cgi@
<!DOCTYPE html>
<html>
<head>
<meta http-equiv="Content-Type" content="text/html; charset=utf-8">
<title>@HOSTDESC@ : @VAR ups.model@ on @HOST@</title>
<style>
body {
text-align: center;
font-family: Verdana, sans-serif;
}
h1 {
display: inline;
margin: 0 0 10px 0;
}
h2 {
font-size: 0.9em;
margin: 5px 0;
/*font-weight: normal;*/
}
.disp {
font-size: 4em;
}
.widget {
margin: 10px auto;
background: #ccc;
max-width: 440px;
padding: 5px 0;
}
</style>
</head>
<body>
<h1>UPS Stats</h1> Fetched: @DATE %X %Z@
<div id="output"></div>
<script>
/* Test Vars */
/*var uStatusRaw = "OB";
var uCharge = "50%";
var uRuntime = "11:11:11";
var uVoltage = "100 V";
var uLoad = "80 W";
var uBypassCurrent = "0.00";*/
/* Prod Vars */
var uStatusRaw = "@VAR ups.status@";
var uCharge = "@VAR battery.charge@%";
var uRuntime = "@RUNTIME@";
var uVoltage = "@VAR input.voltage@ V";
var uLoad = "@VAR ups.realpower@ W";
var uBypassCurrent = "@VAR input.bypass.current@";
var output = document.getElementById("output");
function includes(string, substring) {
return string.toLowerCase().indexOf(substring.toLowerCase()) != -1;
}
function putPanel(title, content) {
var c = document.createElement("div");
c.className = "widget";
var h = document.createElement("h2");
var d = document.createElement("div");
d.className = "disp";
h.textContent = title;
d.textContent = content;
c.appendChild(h);
c.appendChild(d);
output.appendChild(c);
}
var uStatus;
var showRuntime;
var ol = includes(uStatusRaw, "OL");
var ob = includes(uStatusRaw, "OB");
if ((uBypassCurrent !== "0.00") && ol) {
uStatus = "STANDBY";
showRuntime = false;
} else if (ol) {
uStatus = "ONLINE";
showRuntime = false;
} else if (ob) {
uStatus = "BATTERY"
showRuntime = true;
} else {
uStatus = uStatusRaw;
showRuntime = false;
}
putPanel("Status", uStatus);
putPanel("Charge", uCharge);
if (showRuntime) {
putPanel("Runtime", uRuntime);
} else {
putPanel("Mains Voltage", uVoltage);
}
putPanel("Load", uLoad);
</script>
</body>
</html>Next, here’s the “wrapper page” that you’ll want to load from the Kindle. Put this on a local web server accessible from the Kindle - it can be the same server that’s serving NUT CGI. I put mine at /var/www/html/stats/index.html, to be accessed by pointing the Kindle to http://[LOCAL SERVER IP]/stats/.
<!DOCTYPE html>
<html lang="en">

<head>
  <meta charset="utf-8">
  <meta name="robots" content="noindex">
  <link rel="icon" type="image/x-icon" href="favicon.ico">
  <title>UPS Stats</title>
  <style type="text/css">
    body, html
    {
        margin: 0; padding: 0; height: 100%; overflow: hidden;
    }

    #content
    {
        position:absolute; left: 0; right: 0; bottom: 0; top: 0px;
    }
  </style>
</head>

<body>
    <div id="content">
        <iframe width="100%" height="100%" frameborder="0" src="/cgi-bin/nut/upsstats.cgi?host=ups@localhost"></iframe>
    </div>
    <script>
      const ifr = document.getElementsByTagName("iframe")[0];
      setInterval(function() {
        ifr.src += ''; // Refresh
      }, 10 * 1000);
    </script>
</body>
</html>
Since my NUT CGI is on the same server as this wrapper page, I used a relative link in my iframe. Not much else to say about this page.
Conclusion
When I put together this display, I had a suspicion that it might grow into something I’d want to document on my blog. Thankfully, this time I had already documented most of the process for myself in case I ever need to rebuild my server. I love projects that end up in something interesting I can add to my home office. Thanks for reading!
More Articles Tagged #tech
-

The Block Size Debate: 5 Years Later
27 August 2020 cryptocurrency tech -

The Absurdity Of Paying For 5G
06 August 2020 tech -

Why Is It Called “Punycode”?
18 July 2020 tech